Note to readers: This is the 2nd post in our series about creating and launching your first course. If you’ve been following along, great! If you’re new here, you can read part one by clicking on the links.
Here’s a sobering thought:
Most people who dream of creating an online course never do, and of those who start down the path, most never finish.
And the scariest part is that of those who do finish, only a small percentage end up being successful and selling well.
The reason?
They assume that creating a course is easy, and that all they have to do is throw a bunch of things that they know into a course platform — achieving instant success.
But once they get started with the process, they realize that it’s not as easy as they imagined.
It’s something we’ve been talking about for a few weeks now — the 15% of course creators who actually get a successful course (or more) out into the world. And we want you to join that elite group.
In March, we got you started with your course creation process. If you followed along with last month’s post, you now know who you are serving, and have a course title, outline, and initial pricing plan completed.
This post will continue to break down the process, helping you to get students in the door, fleshing out your outline into a ready-to-teach course, and getting you across the course creation finish line.
Interested in making sure your course succeeds? Read on.
Since this is a lengthy post with lots of action steps, be sure to bookmark it so that you can reference any of the sections you want to come back to.
The post is broken up into 3 main sections:
Section 1: How to make sure people want what you’re offering
Section 2: Planning, drafting and editing your course material
Section 3: How to ensure your students have a great course experience
Section 1: How to make sure people want what you’re offering
You may think that the next step is to start turning your outline into full lessons, but we’re not there quite yet.
Before you spend any more of your valuable time and effort on creating your course, you’ll want to make sure that people are interested in it.
You may be thinking, “but I did all my research, and figured out what problem my audience is having. Can’t I just sell them my solution?”
Yes, you could. But you really shouldn’t — at least not yet.
It’s something that many people have to learn the hard way. They create a course without validating that the solution is what people are looking for, and end up with a course that fizzles out, or completely flops.
So before you do anything else, you need to…
Create minimal content and validate demand
One of the places we see aspiring course creators get stuck (all the time) is procrastinating about actually getting their first students in the door.
 In order to cut that procrastination off before it can even start, you’re going to invite people to join your course, in advance of the launch.
This ensures that you stay motivated, and that you’re headed in the right direction with your solution to their problem.
It also makes sure that people are actually interested in the solution that you’re offering and the way that you’re presenting that solution to them.
One way to think about this process is a strategy that Danny Iny follows with his Course Builder’s Laboratory: you beta test your idea for a course by running a pilot group, creating minimal content and validating both that people will buy your course, and that you can deliver on your promise — before you commit to creating a full course.
Another approach is one that Regina Anaejionu recommends — she offers several ways to “preview” your course to people, to gauge their interest, including social and email tactics.
You can also do some dual-purpose research in this phase by reaching out to your audience, talking on the phone and emailing with them. You can ask about the problems that they’re facing, and see if any of them want to be beta testers for your first round course.
As well as getting more information about the problem you’re looking to solve (in your audience’s language), you’ll be able to start making connections with people who might end up being your first students.
Now that you know how important it is to gauge interest before you start fleshing out your course, it’s time to…
Start sending out the invites
Here’s where some of that research you did earlier can really come in handy.
Did you talk to anyone on the phone (or in person) or via email who you think would be a good fit for the course? Do you know anyone who is having the problem that you’re solving?
If so, add them to a list of people you’ll invite to participate in your course.
You’ll do this by drafting an email to your mailing list or personal network — inviting people to raise their hands.
If you already have an audience and a mailing list, Paul Jarvis says that a mailing list is the best tool in your arsenal when promoting a digital product.
But even if you don’t have an official mailing list, you still have a personal network, and the people you talked to during the research phase.
Are you crazy? I don’t even have a course built yet!
You’ve narrowed your focus and now it’s almost time to invite people to sign up for your course… even though the course doesn’t exist yet.
 Whoa. Are you freaking out right now?!
It may feel really intimidating to ask someone to say yes to something that’s just an outline, but this is the pivotal place where you have the chance to basically guarantee that people will buy what you end up creating.
Admittedly, this is where we’re asking you to trust us and know that we have your best interests at heart.
So let’s explain why we are asking you to do this:
When you have people who are interested in (and waiting on) your course, you create an expectation for yourself that you are going to deliver value to those people. Those people are now counting on you!
Sometimes it can be really hard to stay motivated when you’re only accountable to yourself. By creating this connection with your future course participants, you tap into a natural source of motivation.
It’s one of the most powerful incentives that you can tap into. It will energize you as you work to design your course and create learning activities for your students.
And remember — you have the outline of your course. You have the title, that tells people what they’re expecting. You know the #1 outcome that you’re offering.
So you’re all set to answer most of the questions that potential students might ask. You don’t need anything else at this stage. Really!
So take a deep breath, and grab a mug of chamomile tea, and let’s get going.
Here’s how you get started
The strategy here is for you to connect with potential participants via email and social media.
Just to be clear — you DO NOT need a big audience of people who are already interested in your course. It doesn’t hurt, but it’s not necessary.
Turns out, a lot of people who start on their course building journey get stuck here, thinking that they need to build up their mailing list before they get started.
It can go either way, but list building takes a long time, and our focus is on getting you up and running with your course as soon as we can.
It may be a little scary to take a leap of faith, but you’ll be validating a lot as you get your first people involved with your course — and that validation will help keep you moving forward.
Draft up your emails
Depending on where you stand in building a community around your work and content, you’ll write one of two different types of emails:
- Email to your mailing list: If you have a mailing list of interested people set up in a tool like Mailchimp [affiliate link] or Aweber, then you can send a broadcast email campaign to your list.
- Personal emails: If you don’t have a mailing list set up, you can send personal emails directly to people who may be interested in the course. For example, you might email clients and former clients, people who attended an in-person workshop with you, people who you interviewed during the research phase, friends, family members, etc.
 Each of these emails will be written a little differently, depending on the audience. The things that you’ll want to include are:
- A compelling subject line.
- A few details about what you’re working on, with a strong emphasis on the benefit that your students will receive if they participate.
- An offer of an early adopter discount, if you’ve decided to offer one.
- A request for them to “raise their hand” and say they’re interested.
Honestly, email is probably going to be your best source of signups for your course. But, depending on your community, social media can also be a valuable source of students.
Don’t forget social media
On social media, it’s worth trying two different types of posts.
- A direct invitation, written in a very personal style.
- By sharing a question or your point of view, and then following up with people who engage with the post.
3… 2… 1… make the ask!
Our first challenge to you for this month is to get at least five people to commit to joining your course.
Remember, we’re doing this to get your course out into the world where it can help people — but that’s really hard to do if you’re creating a course on your own, in your own little bubble.
What we want to see happen is for you to create a connection with real people who want your course to come to life.
Suddenly you’re no longer answering to yourself. Instead, you’re serving a community of learners who are counting on you to deliver, with the added bonus that you’ve done the first step in validating that your solution is what people want.
Section 2: Planning, drafting and editing your course material
Now that you have that pesky problem of motivation out of the way, it’s time to estimate how long it will take you to finish up the rest of the steps you need to take to get your course out the door.
You want to make sure that you make steady forward progress with the actual creation, because you have people counting on you!
Plus, as Hugh Culver says, “six months endlessly toiling away in your basement to build a 12-module monster nobody wants is not a good plan.”
To create a fully-finished online course, your time will be separated into four buckets:
-
-
- fleshing out the course content,
- adding the content to your course platform,
- maintaining the content, and
- marketing the course.
-
A mistake that lots of new course creators make is worrying too much about the technology, but if you’re a Ruzuku instructor you don’t have to worry — we’ve got your back, and the Ruzuku course platform makes things super simple for you.
The rest of this post will cover the steps you need to take to flesh out the course content.
While it will only focus on getting your initial batch of students in the door, we’ll also be talking a lot more about bigger ways to market your course in the upcoming months.
And, now that you have an idea about how you’ll be dividing your time in the near future, we can get back to the course creation… finally!
Don’t work in a vacuum — co-create!
Now that you have some people with their hands raised, you can start co-creating your course content with them.
That doesn’t mean that you have to let them make the final decision about everything about your course, but it does mean that you have an opportunity to learn from them as you’re putting together the course material.
 It means having the opportunity to see how content works best for your audience, what formats seem to help them learn the subject matter, and how you should present the material for maximum impact.
Sean Wes shows us that one possible way to co-create with your audience is to validate your idea through hosting an in-person workshop.
This allows you to do a type of beta test with real audience members, and to get their feedback on how the material worked for them.
Along these lines, last week we interviewed Andrea Mielke Schroer, who based her very first online course on a class that she used to teach in person.
So whether you host a live version of your course, run a beta test or pilot version with a small group of people, or find some other way to get your audience involved with the course creation, we recommend staying connected with them as you build out the course.
Speaking of which…
Now it’s time for more of the fun stuff — time to build out the skeleton of your course into the rough draft of your course!
Write a rough draft of your lessons
As you start to build up your lesson content, remember that you are creating minimal content that will help your participants move toward the #1 outcome.
Something that frustrates us about online course creation is when people get stuck on the idea that they need elaborately produced content to get started.
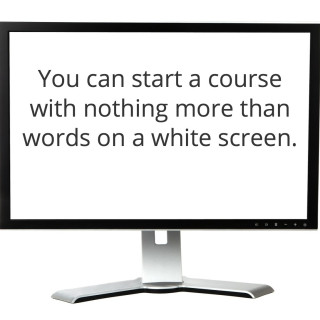 Let’s be clear: you can start a course with nothing more than words on a white screen.
This doesn’t mean you won’t add videos or animations or professionally-designed infographics some day… but that day is not today!
Right now, you want to start with the least amount of information possible to get your students where you want them to go.
We recommend that you write in a personal, conversational tone — speak directly to your learners as though they were close friends seeking your advice.
Each of your modules or lessons can include content like text (or maybe audio or video), as well as action steps, exercises, or questions.
For example, a powerful way to bring your personality into your course is to let people hear your voice.
This doesn’t mean recording a fancy video, and you don’t need an elaborate script. You can start simply by recording audio of yourself answering a question or sharing a story, and then post that recording into your course.
If you’re not sure how to record audio, you can use Vocaroo which is a really simple website. Or, you can use the built-in Voice Memos app on iPhone or iPad and then email yourself the recording using the ‘share’ icon in the app. If you use a Mac, you can also use Quicktime.
The best part about this step is that the content you’re producing can be really, really rough! No editing for now, just get the content out of your head and into logical steps that your students can follow.
Then (and only then), once you have your outline fully filled out, you can start thinking about edits.
As you edit your lessons, read them out loud
A great way to start improving on your lessons is simply by reading your text out loud. (Seriously!)
You’ll notice gaps and opportunities to improve that you never saw before. You might even see places where you missed a key concept or a detail that your students need to know before moving forward.
You can read your lesson text out loud to yourself, or to a friend or colleague. Either way, you’ll come away with fresh ideas.
This is also a good time to look back over the structure of the entire course.
- Does the lesson material flow naturally, covering everything it needs to — from onboarding a new member to getting them to the end of the lessons?
- Do the lessons line up in a way that makes sense?
- Is everything included that needs to be, or is there extraneous information that can be cut?
- And is everything consistent throughout the course material?
Maintaining a consistent look and feel can make all the difference in how your students feel about how professional the course was.
Once you have the lesson drafts edited, now it’s time to start thinking about how your students will interact with your material.
Section 3: How to ensure your students have a great course experience
As you’re figuring out how to prompt your students to take action on the material (so that they can succeed in meeting the #1 outcome of the course), it’s helpful to remember this 1-2-3 formula:
- Identify a clear result or “win” you’re helping your students achieve.
- Outline the minimum amount of content that will help people move toward this result.
- Provide straightforward action steps and exercises so students can apply and integrate the information they’re learning.
 Often, it’s step 3 that gets overlooked — yet it’s actually the most important one.
Let’s say that again: you want your students to be able to apply and absorb everything that you’re teaching them.
Otherwise, we end up with yet another info product that doesn’t really do anyone any good!
For an additional look at how we can make sure this doesn’t happen to us, Copyblogger wrote a great post about how you can motivate students to implement your advice.
To get started with this, you can write up specific action steps that participants in your course can take, or create exercises that they can complete. Or, maybe you can think about creating visual or experiential exercises.
For example, a course about handling stress might include an exercise to take a photograph of a place where you feel calm and happy.
Inbox Zen — a real life example
Inbox Zen is a short course that was created by Danny Iny during his Firepole Marketing years. The course itself is no longer available, but we’ll deconstruct some of the more important aspects of how the course was set up.
Here’s what the course did well:
- Focused on a specific set of people with a clear problem. This course was written for super-busy solopreneurs and internet professionals who feel overwhelmed by their email.
- Moved people toward real, observable outcomes. If a busy solopreneur applied the lessons and action steps, they would be able to get their email inbox to zero, and feel in control of their email for the first time. That’s powerful.
- Helped people achieve these results with a relatively small amount of “teaching.” It used just 6 core lessons to introduce a few key ideas about email management. Then it gave people specific actions to take, such as “turn off email notifications.”
While the course was designed so that it could be delivered primarily over email, it contained multiple different types of content and activities:
- text-based lessons (articles),
- action steps to take immediately,
- actions to practice over time,
- short videos and screencasts, and
- links to other online resources.
The lessons were broken down into sections where the learner is either watching or reading, taking action on something they have learned, practicing a particular tip or trick, or reviewing what they learned in the lesson.
The course then prompted the learners to share — both what their takeaways were, and also to share the course with their friends or colleagues who might benefit from the course.
Looking at this overview of the course, what ideas from the example do you think you might be able to apply to your own course idea?
How can you move people into action in your course?
It’s not a small task, but once you’ve figured out how to motivate your students to take action on the course material, you’re so close to the finish line.
Your next course creation task is to celebrate!
Celebrate your progress!
 Woohoo!
Over the past two months, you’ve learned how to do a lot of great things:
- You’ve figured out who you’re serving, the problem you’re solving, and you’ve laid out your initial course outline,
- You’ve written up the starting version of your content, you’ve put some finishing touches on it, and
- You’ve even gotten some people to raise their hands to say they’re interested in your course.
Take a break, and give yourself credit where credit is due. You’ve done a lot of hard work!
And once you’ve taken a little celebration break, it’s time to reach out to those people who raised their hands, and ask if they want to take a test run of your course.
To test, or not to test
At this point, we highly recommend doing deeper validation of some sort.
You started validating by getting people to raise their hands, and now it’s time to do some in-depth validation by getting people to actually sign up.
You can run a small paid pilot version of your course (maybe giving the participants an early-adopter discount), or offer the course to a small group of beta testers.
Remember, you want to make sure that the way the course is presented is something that people want to take, and that you can deliver on the promise of the course.
The reason we’re doing all this validation is to make sure that your course doesn’t flop!
That way, when we get into how to market your course starting next month, you’ll be well on your way to being ready to launch the first full version of your (soon to be successful) course!
Join the elite 15%
Now, the time has come.
Time to put the plan into action, and get you into the 15% of course creators who actually have a course out in the wild.
Last month’s post got us halfway there, and now you have the tools to get the rest of the course material ready to go.
How about it?
Will 2016 be the year you finally cross the finish line with your course?
We’re with you every step of the way. So let’s get started — pick up where you left off last month, review the steps in this post, and then do one small, achievable task at a time.
Let us know in the comments where your course stands, what step you’re planning to take next, or where you could use some help!